Build a LoRaWAN gateway with a Raspberry Pi
Excited about LoRaWAN and want to take up building your own gateway? Check out what it takes!
- Introduction
- Build Your Own Gateway
- Part 0. Required Hardware Parts
- Part 1. Gateway Assemble!
- Part 2. Install Raspbian on Raspberry Pi
- Part 3. Boot and Configure the Raspberry Pi
- Part 4. Build the BasicStation packet forwarder
- Part 5. Derive Gateway EUI
- Part 6. Register the Gateway on The Things Network
- Part 7. Create an API Key to Authenticate your Gateway
- Part 8. Configure BasicStation
- Part 9. Test packet forwarder
- Part 10. Run as a system service
- Part 11. Enjoy!
- References
Introduction
My days working on The Things Network may belong in the past, but my love for LoRaWAN and Internet Of Things do not. In this guide, I will describe the steps required to setup your own gateway using a Raspberry Pi and a iC880A LoRa concentrator board. Even though most online guides configure the gateway to use some rendition of the legacy UDP packet forwarder, I will instead use the BasicsStation, which allows authenticated gateway connections and greatly simplifies gateway configuration.
This entry will be quite lengthy, as it describes the whole process starting from installing Raspbian on a clean Raspberry Pi to connecting our gateway to The Things Network. It should be safe to skim over parts you are already familiar with (e.g. Installing Raspbian), but I greatly suggest that you read all of it.
Before getting to it, I want to give huge props to Gonzalo Casas, whose excellent work in From zero to LoRaWAN in a weekend is what made this project possible and gave me the main inspiration to write this entry. In fact, go ahead and read that first, then return to this guide to configure BasicStation.
The rest of this post will be split into parts. Take your time with each part, and make sure that you have not missed any configuration before proceeding to the next.
Let’s get started!
Build Your Own Gateway
Part 0. Required Hardware Parts
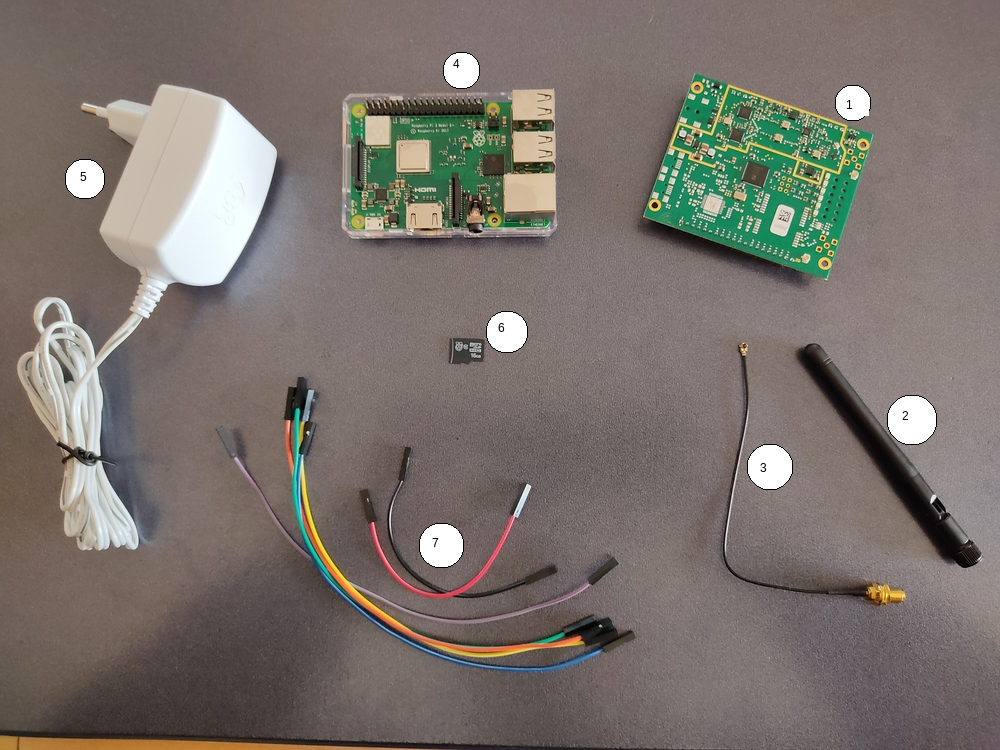
The table below lists all the hardware that we will need.
| Item | Part | Notes | Order / Links |
|---|---|---|---|
| 1 | iC880A-SPI concentrator board | This is the main component that we need | IMST Webshop |
| 2 | Antenna (3.5dBi - 7.5dBi) | Even a cheap 3.5dBi antenna will suffice for development environments. | |
| 3 | Pigtail for antenna | IMST Webshop | |
| 4 | Raspberry Pi (Model 2 or newer) | Raspberry Pi Model 3+ comes with WiFi. | |
| 5 | Power Supply 2.5A with micro USB | ||
| 6 | MicroSD Card (4GB+) | ||
| 7 | 7x Dual female jumper wires | To connect the concentrator board with the Raspberry Pi | |
| 8 | Ethernet Cable or WiFi dongle | Our gateway needs internet connectivity to reach The Things Network. |
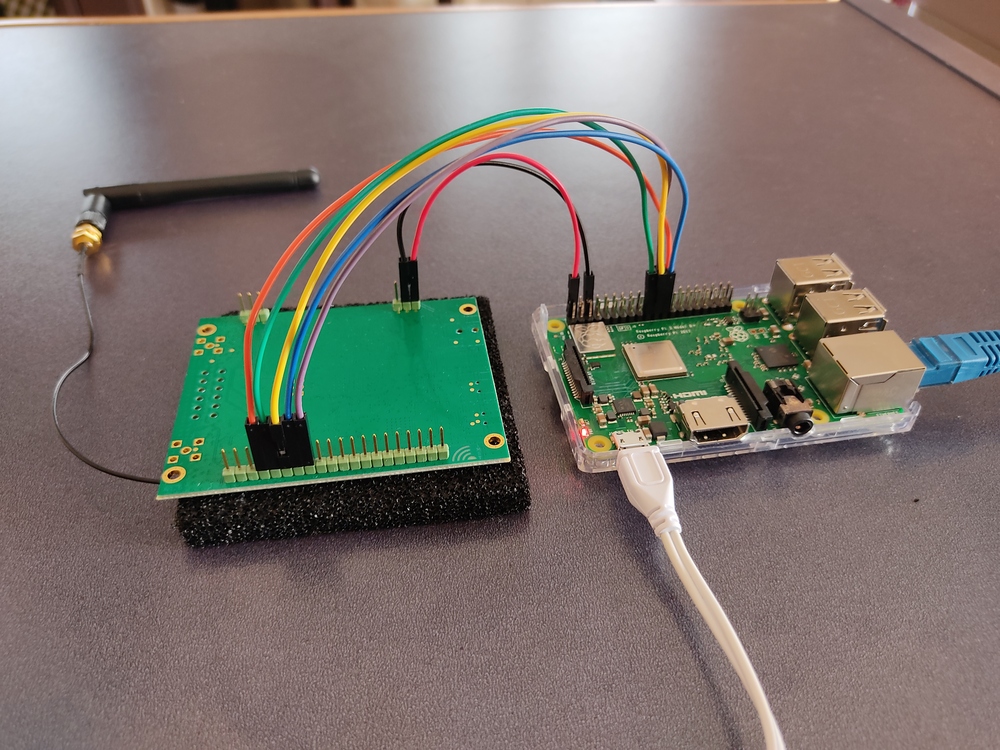
Part 1. Gateway Assemble!
Install the antenna on the iC880a board.

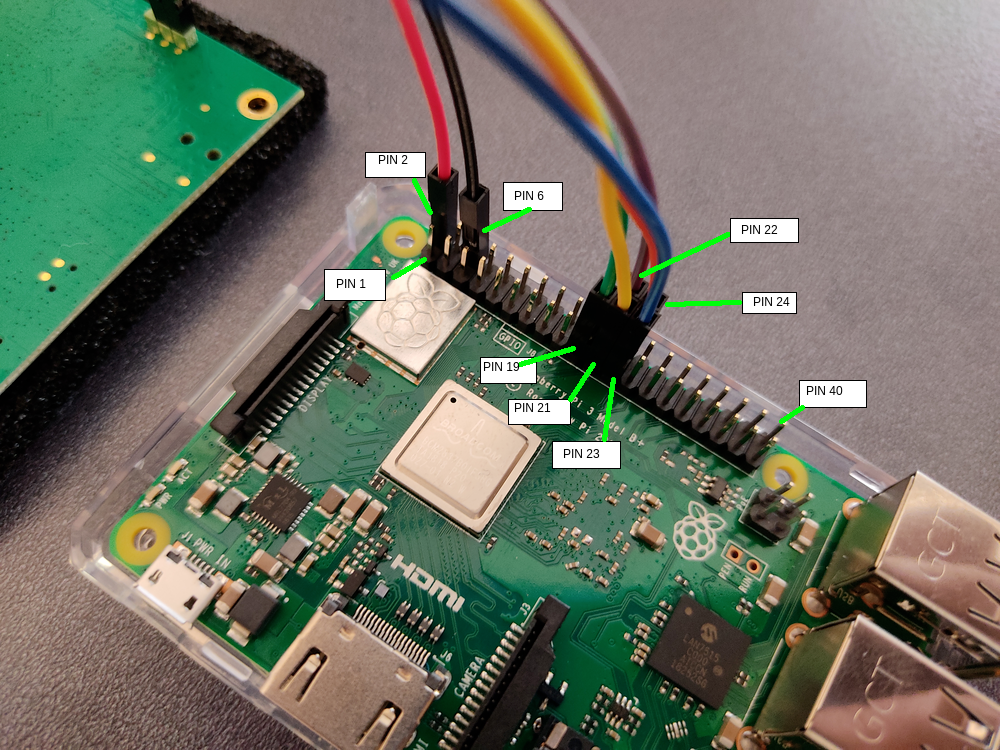
Use the dual female jumper cables to connect the iC880a pins to the respective Raspberry Pi pins, as explained in the table below.
iC880a pin Raspberry Pi pin Description 21 2 Supply 5V 22 6 GND 13 22 Reset 14 23 SPI CLK 15 21 MISO 16 19 MOSI 17 24 NSS Double-check to make sure that you have connected the pins correctly.

Close-up on the iC880A concentrator board:

Close-up on the Raspberry Pi:
Part 2. Install Raspbian on Raspberry Pi
Use the Raspberry Pi Imager to install an operating system. For the rest of the guide, I will be using Raspbian Lite 64bit (we do not need a Desktop).
(Optional) Make sure that SSH access is enabled by default when the Raspberry Pi boots, by mounting the
bootpartition of the SD card, and creating an empty file calledssh. For example, if on Ubuntu:touch /media/$USER/boot/sshThis step is useful if you want to avoid connecting the Raspberry Pi to an external screen for the initial setup.
Part 3. Boot and Configure the Raspberry Pi
WARNING: Make sure that the antenna is connected to the iC880A before powering on the Raspberry Pi. DO NOT POWER ON THE RASPBERRY PI IF THE ANTENNA IS NOT CONNECTED.
Plug the SD card on the Raspberry Pi and connect the power supply.
Wait until the Raspberry Pi comes up. Connect an external screen and keyboard, or find out its IP address in your local network and connect with SSH. The default username is
piand the default password israspberry.NOTE: Connecting via SSH assumes that you have enabled SSH access in Part 2.
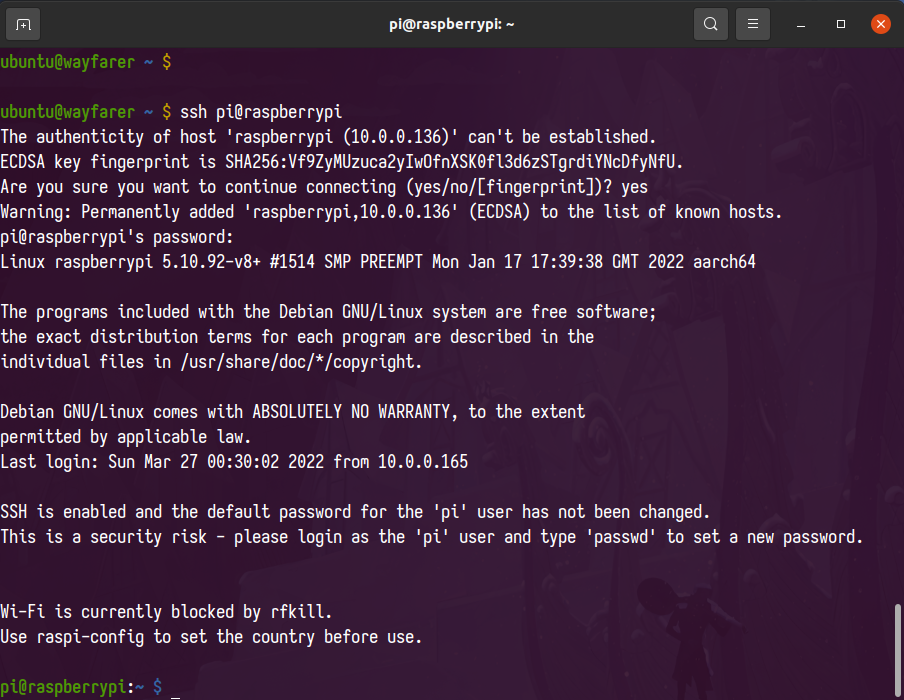
After logging in, follow the advice of the welcome text and change the default password of the
piuser:passwdUpgrade the system packages to the latest versions:
sudo apt-get update
sudo apt-get upgrade
Enable the SPI interface by running the
raspi-configtool:sudo raspi-configA window will appear, use the arrow keys and
Enterto navigate to 3 Interface Options > I4 SPI. Select <Yes> in the dialog asking if the SPI interface should be enabled.Use
Escapeto exit the tool after the SPI interface is enabled.Install packages that we will need to build the packet forwarder.
sudo apt-get install git gcc make
Part 4. Build the BasicStation packet forwarder
Clone the source code repository:
git clone https://github.com/lorabasics/basicstationBuild the basicstation binary:
cd basicstation make platform=rpi variant=std ARCH=$(gcc --print-multiarch)NOTE: The
ARCH=$(gcc --print-multiarch)flag is needed for arm64 architectures.Ensure the binary was built successfully with:
./build-rpi-std/bin/station --versionThe output should look similar to:
Station: 2.0.6(rpi/std) 2022-03-26 17:43:16
Package: (null)
Install the station binary under
/opt/ttn-station:sudo mkdir -p /opt/ttn-station/bin sudo cp ./build-rpi-std/bin/station /opt/ttn-station/bin/station
Part 5. Derive Gateway EUI
The Gateway EUI is a unique 64-bit integer used to identify a gateway, and is typically derived from the MAC address of one of the gateway’s network interfaces.
For our gateway, we will use the MAC address of the eth0 interface:
Get the MAC address of the
eth0interface and derive the gateway EUI by addingfffeafter the first 3 bytes:export MAC=`cat /sys/class/net/eth0/address` export EUI=`echo $MAC | awk -F: '{print $1$2$3 "fffe" $4$5$6}'` echo "The Gateway EUI is $EUI"The output should look similar to:
The Gateway EUI is b827ebfffee00c83Note down the Gateway EUI, as we will use it in the next steps.
Part 6. Register the Gateway on The Things Network
NOTE: The instructions below refer to Europe. If you are in a different region, make sure to pick the cluster that is closest to you.
NOTE: For any questions, refer to the documentation of The Things Stack for Adding Gateways.
Sign in to The Things Network Console. If you do not have an account already, the process takes a few seconds.
Go to the Gateways tab.
Click on + Add gateway.
Fill in the Gateway ID with a unique name for the Gateway. This can be a descriptive name, e.g.
gateway-floor-2, or the gateway EUI.Fill in the Gateway EUI field with the gateway EUI you derived in the previous step.
(Optional, but recommended) Tick the Enabled box under Require authenticated connection.
In LoRaWAN options > Frequency Plan, choose Europe 863-870 MHz (SF9 for RX2 - recommended).
Click on Create gateway at the bottom of the page.
Part 7. Create an API Key to Authenticate your Gateway
NOTE: See also the documentation of The Things Stack for LoRa Basics (TM) Station > LoRaWAN Network Server.
We will need to create an API key for our gateway, which will be used by BasicStation to authenticate.
Under Gateways, open the gateway you created previously.
On the sidebar, find API keys.
Click on + Add API key.
Give a descriptive name to your API key (e.g. LNS), and grant the Link as Gateway to a Gateway Server for traffic exchange, i.e. write uplink and read downlink right.
Click Create API key at the bottom of the page.
A popup window will appear, make sure to copy the API key, as we will use it the next section.
NOTE: The API key will look like this:
NNSXS.XXXXXXXXXXXXXXX.YYYYYYYYYYYYYYYYYY
NOTE: It is impossible to get the value of the API key after closing the window. If you lose the API key, you will need to create a new one.
Part 8. Configure BasicStation
The next step is to create the configuration files that are required for BasicStation to connect to The Things Network. We will need to create 4 configuration files: tc.key, tc.trust, tc.uri and station.conf. Follow the steps below:
On the Raspberry Pi, create a new directory
/opt/ttn-station/config:sudo mkdir -p /opt/ttn-station/configCreate the
tc.uriconfig file. This must contain the LNS server address. For The Things Network, the server is available atwss://eu1.cloud.thethings.network:8887.echo 'wss://eu1.cloud.thethings.network:8887' | sudo tee /opt/ttn-station/config/tc.uriNOTE: If running on a region other than Europe, make sure to swap
eu1with the name of the cluster you are using, e.g.nam1.Create the
tc.keyconfig file. This must contain an authorization header with the API key we created previously, and will be used to authenticate the gateway connection. Note that if the API key is not set, then BasicStation will fail to connect.# this is the API key that we created in the previous section export APIKEY="NNSXS.XXXXXXXXXXXXXXX.YYYYYYYYYYYYYYYY" # the perl command ensures that the line ending is `\r\n` echo "Authorization: Bearer $APIKEY" | perl -p -e 's/\r\n|\n|\r/\r\n/g' | sudo tee -a /opt/ttn-station/config/tc.keyCreate the
tc.trustconfig file. This is the root CA that will be used to check the certificates of the LNS server. We can simply use the system CA certificates:sudo ln -s /etc/ssl/certs/ca-certificates.crt /opt/ttn-station/config/tc.trustCreate the
station.confconfig file. This contains configuration options for the concentrator. Create the file with:NOTE: Setting the
routeridoption to the gateway EUI is not required, but this saves us from surprises down the road.export MAC=`cat /sys/class/net/eth0/address` export EUI=`echo $MAC | awk -F: '{print $1$2$3 "fffe" $4$5$6}'` echo ' { /* If slave-X.conf present this acts as default settings */ "SX1301_conf": { /* Actual channel plan is controlled by server */ "lorawan_public": true, /* is default */ "clksrc": 1, /* radio_1 provides clock to concentrator */ /* path to the SPI device, un-comment if not specified on the command line e.g., RADIODEV=/dev/spidev0.0 */ /*"device": "/dev/spidev0.0",*/ /* freq/enable provided by LNS - only HW specific settings listed here */ "radio_0": { "type": "SX1257", "rssi_offset": -166.0, "tx_enable": true, "antenna_gain": 0 }, "radio_1": { "type": "SX1257", "rssi_offset": -166.0, "tx_enable": false } /* chan_multiSF_X, chan_Lora_std, chan_FSK provided by LNS */ }, "station_conf": { "routerid": "'"$EUI"'", "log_file": "stderr", "log_level": "DEBUG", /* XDEBUG,DEBUG,VERBOSE,INFO,NOTICE,WARNING,ERROR,CRITICAL */ "log_size": 10000000, "log_rotate": 3, "CUPS_RESYNC_INTV": "1s" } } ' | sudo tee /opt/ttn-station/config/station.confCreate the
start.shscript. The script resets the iC880A PIN, waits for network connectivity and then starts the packet forwarder:echo '#!/bin/bash # Reset iC880a PIN SX1301_RESET_BCM_PIN=25 echo "$SX1301_RESET_BCM_PIN" > /sys/class/gpio/export echo "out" > /sys/class/gpio/gpio$SX1301_RESET_BCM_PIN/direction echo "0" > /sys/class/gpio/gpio$SX1301_RESET_BCM_PIN/value sleep 0.1 echo "1" > /sys/class/gpio/gpio$SX1301_RESET_BCM_PIN/value sleep 0.1 echo "0" > /sys/class/gpio/gpio$SX1301_RESET_BCM_PIN/value sleep 0.1 echo "$SX1301_RESET_BCM_PIN" > /sys/class/gpio/unexport # Test the connection, wait if needed. while [[ $(ping -c1 google.com 2>&1 | grep " 0% packet loss") == "" ]]; do echo "[TTN Gateway]: Waiting for internet connection..." sleep 30 done # Start station /opt/ttn-station/bin/station ' | sudo tee /opt/ttn-station/bin/start.sh # ensure start.sh is executable sudo chmod +x /opt/ttn-station/bin/start.sh
Part 9. Test packet forwarder
At this point, we have completed the configuration of the packet forwarder. Before proceeding to the final step, we will start it up and verify that everything is working as expected.
Fire up the packet forwarder with the following commands:
cd /opt/ttn-station/config
sudo RADIODEV=/dev/spidev0.0 /opt/ttn-station/bin/start.sh
This will initialize the board, connect our gateway to The Things Network, fetch configuration based on the Frequency plan and then start listening for packets:
2022-03-27 02:11:32.645 [SYS:INFO] Logging     : stderr (maxsize=10000000, rotate=3)
2022-03-27 02:11:32.645 [SYS:INFO] Station Ver : 2.0.6(rpi/std) 2022-03-27 00:43:16
2022-03-27 02:11:32.646 [SYS:INFO] Package Ver : (null)
2022-03-27 02:11:32.646 [SYS:INFO] mbedTLS Ver : 2.28.0
2022-03-27 02:11:32.646 [SYS:INFO] proto EUI   : 0:b827:ebe0:c83	(/sys/class/net/eth0/address)
2022-03-27 02:11:32.646 [SYS:INFO] prefix EUI  : ::1	(builtin)
2022-03-27 02:11:32.646 [SYS:INFO] Station EUI : b827:ebff:fee0:c83
2022-03-27 02:11:32.646 [SYS:INFO] Station home: ./	(builtin)
2022-03-27 02:11:32.647 [SYS:INFO] Station temp: /var/tmp/	(builtin)
2022-03-27 02:11:32.647 [SYS:WARN] Station in NO-CUPS mode
2022-03-27 02:11:32.848 [TCE:INFO] Starting TC engine
2022-03-27 02:11:32.979 [AIO:INFO] ./tc.trust:
cert. version     : 3
serial number     : 5E:C3:B7:A6:43:7F:A4:E0
issuer name       : CN=ACCVRAIZ1, OU=PKIACCV, O=ACCV, C=ES
subject name      : CN=ACCVRAIZ1, OU=PKIACCV, O=ACCV, C=ES
issued  on        : 2011-05-05 09:37:37
expires on        : 2030-12-31 09:37:37
signed using      : RSA with SHA1
RSA key size      : 4096 bits
basic constraints : CA=true
subject alt name  :
    <unsupported>
key usage         : Key Cert Sign, CRL Sign
certificate policies : An2022-03-27 02:11:32.979 [TCE:INFO] Connecting to INFOS: wss://eu1.cloud.thethings.network:8887
2022-03-27 02:11:33.763 [TCE:INFO] Infos: b827:ebff:fee0:c83 muxs-::0 wss://eu1.cloud.thethings.network:8887/traffic/eui-B827EBFFFEE00C83
2022-03-27 02:11:33.763 [AIO:DEBU] [3] ws_close reason=1000
2022-03-27 02:11:33.763 [AIO:DEBU] Echoing close - reason=1000
2022-03-27 02:11:33.763 [AIO:ERRO] Recv failed: SSL - The peer notified us that the connection is going to be closed
2022-03-27 02:11:33.763 [AIO:DEBU] [3] WS connection shutdown...
2022-03-27 02:11:33.893 [AIO:INFO] ./tc.trust:
cert. version     : 3
serial number     : 5E:C3:B7:A6:43:7F:A4:E0
issuer name       : CN=ACCVRAIZ1, OU=PKIACCV, O=ACCV, C=ES
subject name      : CN=ACCVRAIZ1, OU=PKIACCV, O=ACCV, C=ES
issued  on        : 2011-05-05 09:37:37
expires on        : 2030-12-31 09:37:37
signed using      : RSA with SHA1
RSA key size      : 4096 bits
basic constraints : CA=true
subject alt name  :
    <unsupported>
key usage         : Key Cert Sign, CRL Sign
certificate policies : An2022-03-27 02:11:33.893 [TCE:VERB] Connecting to MUXS...
2022-03-27 02:11:34.505 [TCE:VERB] Connected to MUXS.
2022-03-27 02:11:34.564 [RAL:INFO] Lora gateway library version: Version: 5.0.1;
2022-03-27 02:11:34.577 [RAL:INFO] [LGW lgw1] clksrc=1 lorawan_public=1
2022-03-27 02:11:34.577 [RAL:INFO]  RX/TX RF0:    867.5MHz rssi_offset=-166.0 type=2 tx_notch_freq=0
2022-03-27 02:11:34.578 [RAL:INFO]  RX    RF1:    868.5MHz rssi_offset=-166.0 type=2 tx_notch_freq=0
2022-03-27 02:11:34.578 [RAL:INFO]  [mSF]   0:    868.1MHz rf=1 freq=-400.0 datarate=0
2022-03-27 02:11:34.578 [RAL:INFO]  [mSF]   1:    868.3MHz rf=1 freq=-200.0 datarate=0
2022-03-27 02:11:34.579 [RAL:INFO]  [mSF]   2:    868.5MHz rf=1 freq=  +0.0 datarate=0
2022-03-27 02:11:34.579 [RAL:INFO]  [mSF]   3:    867.1MHz rf=0 freq=-400.0 datarate=0
2022-03-27 02:11:34.579 [RAL:INFO]  [mSF]   4:    867.3MHz rf=0 freq=-200.0 datarate=0
2022-03-27 02:11:34.579 [RAL:INFO]  [mSF]   5:    867.5MHz rf=0 freq=  +0.0 datarate=0
2022-03-27 02:11:34.580 [RAL:INFO]  [mSF]   6:    867.7MHz rf=0 freq=+200.0 datarate=0
2022-03-27 02:11:34.580 [RAL:INFO]  [mSF]   7:    867.9MHz rf=0 freq=+400.0 datarate=0
2022-03-27 02:11:34.580 [RAL:INFO]  [STD]   8:    868.3MHz rf=1 freq=-200.0 datarate=2 bw=2
2022-03-27 02:11:34.580 [RAL:INFO]  [FSK]   9:    868.8MHz rf=1 freq=+300.0 datarate=50000 bw=0 sync_word=0/0
2022-03-27 02:11:34.580 [RAL:INFO] SX130x LBT not enabled
2022-03-27 02:11:34.581 [RAL:INFO] Station device: /dev/spidev0.0 (PPS capture disabled)
2022-03-27 02:11:34.581 [HAL:INFO] [lgw_spi_open:101] Setting SPI speed to 8000000
2022-03-27 02:11:34.581 [HAL:INFO] [lgw_spi_open:135] Note: SPI port opened and configured ok
2022-03-27 02:11:37.521 [RAL:INFO] Concentrator started (2s940ms)
2022-03-27 02:11:37.521 [S2E:INFO] Configuring for region: EU868 -- 863.0MHz..870.0MHz
2022-03-27 02:11:37.521 [S2E:INFO]   DR0  SF12/BW125
2022-03-27 02:11:37.521 [S2E:INFO]   DR1  SF11/BW125
2022-03-27 02:11:37.521 [S2E:INFO]   DR2  SF10/BW125
2022-03-27 02:11:37.521 [S2E:INFO]   DR3  SF9/BW125
2022-03-27 02:11:37.522 [S2E:INFO]   DR4  SF8/BW125
2022-03-27 02:11:37.522 [S2E:INFO]   DR5  SF7/BW125
2022-03-27 02:11:37.522 [S2E:INFO]   DR6  SF7/BW250
2022-03-27 02:11:37.522 [S2E:INFO]   DR7  FSK
2022-03-27 02:11:37.522 [S2E:INFO]   DR8  FSK
2022-03-27 02:11:37.522 [S2E:INFO]   DR9  FSK
2022-03-27 02:11:37.522 [S2E:INFO]   DR10 FSK
2022-03-27 02:11:37.522 [S2E:INFO]   DR11 FSK
2022-03-27 02:11:37.522 [S2E:INFO]   DR12 FSK
2022-03-27 02:11:37.522 [S2E:INFO]   DR13 FSK
2022-03-27 02:11:37.522 [S2E:INFO]   DR14 FSK
2022-03-27 02:11:37.522 [S2E:INFO]   DR15 FSK
2022-03-27 02:11:37.522 [S2E:INFO]   TX power: 16.0 dBm EIRP
2022-03-27 02:11:37.522 [S2E:INFO]             27.0 dBm EIRP for 869.4MHz..869.65MHz
2022-03-27 02:11:37.522 [S2E:INFO]   JoinEui list: 0 entries
2022-03-27 02:11:37.522 [S2E:INFO]   NetID filter: FFFFFFFF-FFFFFFFF-FFFFFFFF-FFFFFFFF
2022-03-27 02:11:37.522 [S2E:INFO]   Dev/test settings: nocca=1 nodc=1 nodwell=1
2022-03-27 02:11:50.009 [S2E:VERB] RX 867.5MHz DR5 SF7/BW125 snr=6.2 rssi=-103 xtime=0xE0000000E34FB4 - updf mhdr=40 DevAddr=260B0748 FCtrl=00 FCnt=35 FOpts=[] 014A mic=1717970429 (14 bytes)
2022-03-27 02:12:06.130 [S2E:VERB] RX 867.3MHz DR5 SF7/BW125 snr=8.0 rssi=-102 xtime=0xE0000001D92CCB - updf mhdr=40 DevAddr=260B0748 FCtrl=00 FCnt=36 FOpts=[] 01EA mic=463407879 (14 bytes)
In the output, we can also see that our gateway has started picking up messages from a test device. Awesome! We can also see the gateway traffic in the Live Data pane in the console of The Things Network!
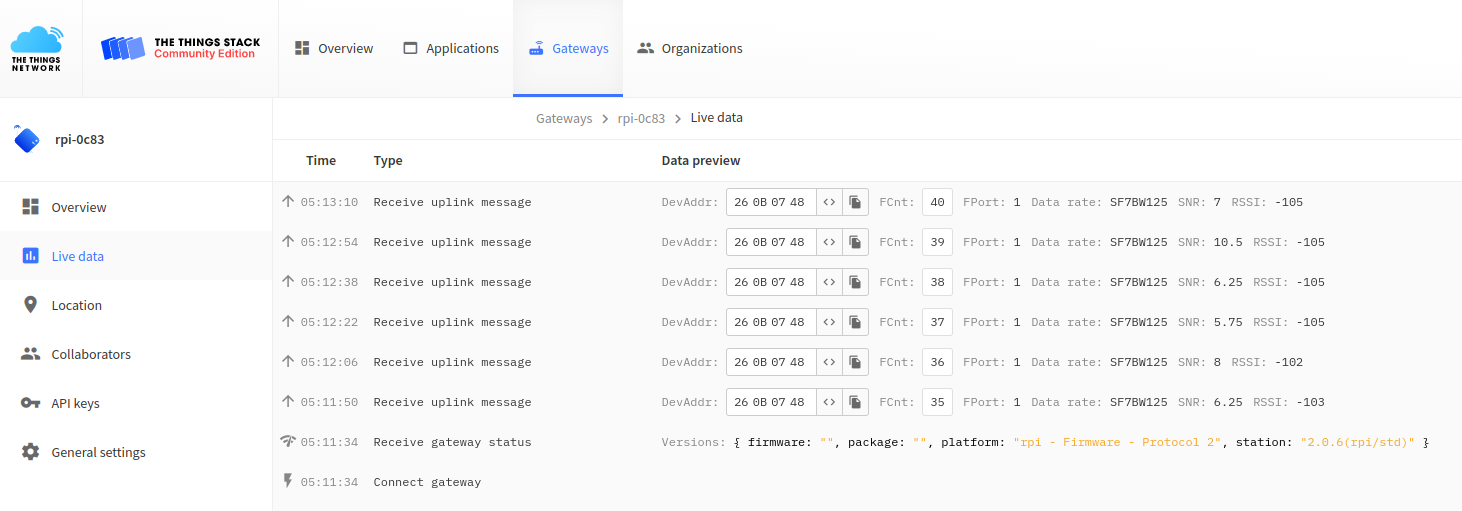
Our gateway is now fully functional, and we can proceed to the final step, which is enabling the packet forwarder to run as a system service.
Part 10. Run as a system service
We will configure our packet forwarder to run as a systemd service. This will ensure that the forwarder starts automatically when the Raspberry Pi reboots.
Create the systemd service configuration file like so:
echo '
[Unit]
Description=The Things Network Gateway

[Service]
WorkingDirectory=/opt/ttn-station/config
ExecStart=/opt/ttn-station/bin/start.sh
SyslogIdentifier=ttn-station
Restart=on-failure
RestartSec=5

[Install]
WantedBy=multi-user.target
' | sudo tee /lib/systemd/system/ttn-station.service
Enable the service, so that it runs automatically when the Raspberry Pi boots:
sudo systemctl enable ttn-stationStart the service.
sudo systemctl start ttn-stationObserve the logs and ensure that everything is working as expected.
sudo journalctl -f -u ttn-station
Part 11. Enjoy!
If you made it all the way to this part, congratulations! This is where the fun begins, use your shiny new gateway to develop your brilliant IoT ideas!